Welcome to Milliaire Winery's Blog Page!
Here you can find information about our wines, recipes using wine and more!
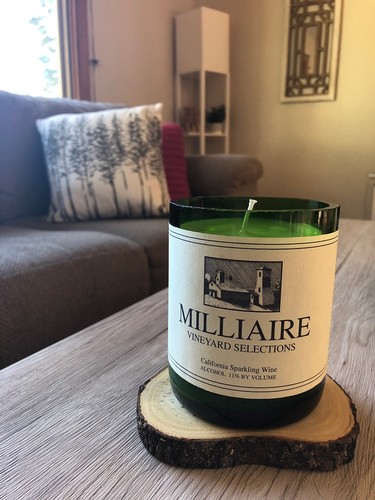
Milliaire Bottle Candle Making
Milliaire Bottle Candle Making

When life gives you leftover Milliaire bottles you don’t just throw them away, you reuse, recycle & repurpose! As part of our mission to waste as little as possible, we donate all our Sparkling, Gewürztraminer, and Muscat bottles to a wine to wick candle maker in our local area. Some of our other bottles, such as the Burgundy shaped bottles with the larger base, are used by other candle makers for their own independent use.
One such candle maker generously shared her secrets of making candles out of our bottles. The key to a great candle? It’s aroma! Sure, it’s best to not crack the glass when making them (make sure you wear your gloves!) but the scent of a freshly poured candle made with T.L.C. is sure to make anyone swoon.
The process is simple, really, but the satisfaction of knowing you made a homemade, DIY candle without the harsh chemicals is the best part.
To start, gather your tools:
*DISCLAIMER* (a lot of this we got off Amazon)
- 5 empty wine bottles
- Diamond Tech Crafts “G2 Bottle Cutter"
- Two large pots
- Sandpaper
- Adhesive – tape or hot glue (we used tape)
- Fragrance oils- 10 ml. bottles (We used P&J Oil)
- Soy Wax- 2lb bag
- Candle Wicks
- Rubber Gloves
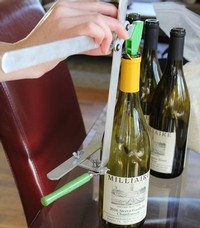
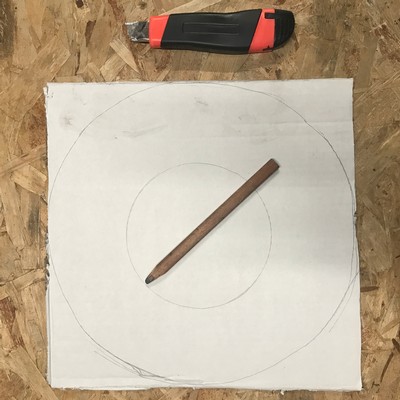
Step 1: Making sure to measure, score your bottles with the cutter, according to its instructions. We made our score just above the label to ensure a nice, clean break that wouldn’t tamper with the label.
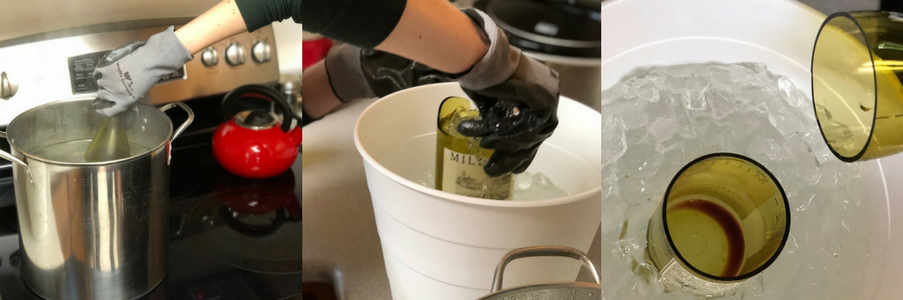
Step 2: Prepare one pot boiling water (needs to be very hot) & one pot ice water (needs to be very cold). Dip first bottle so the score line is submerged in hot water for 10 seconds and immediately place into ice water for another 10 seconds. Repeat process until the bottom of the bottle pops off.
Step 3: Once the base of the bottles have dried, lightly take the sandpaper to the top of the rim to smooth the raw edge. Applying coconut oil after sandpapering also helps to clean and clear any excess waste from the rim. Place bottle bottoms aside.
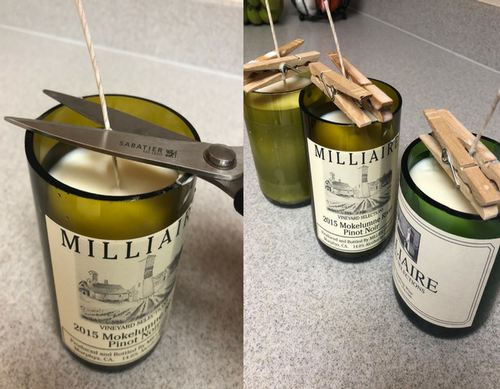
Step 4: Line wicks along bottom of the bottle by using tape or a hot glue gun. Hold them in place with either clothes pins or even mechanical pencils, whatever does the trick!
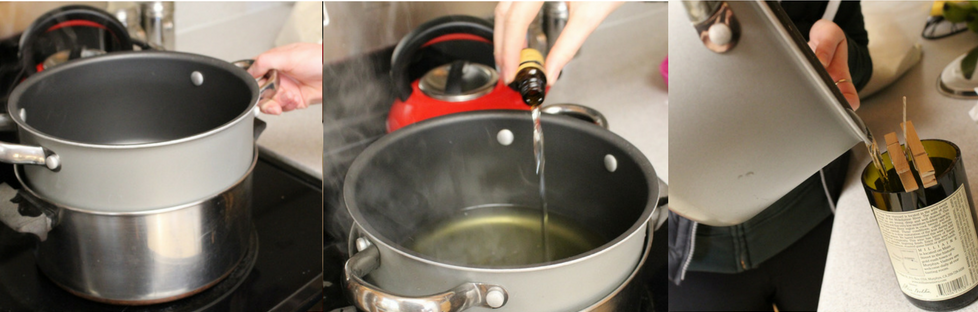
Step 5: Take two pots and place one inside of the other to create a double boiler. Fill bottom pot with boiling water, place top pot inside. Dump soy wax in the top pot as we want indirect heat to melt the wax. Once melted, add desired fragrance oils, about 10 ml per 1 pound of wax.
Step 6: With the wicks securely in place, pour melted, perfumed wax into bottle base. Leave ¼ inch of space at the top. Let stand for 24 hours or overnight and once dry, clip wicks to desired length, about even with the height of the rim of the glass.
Step 7: If your labels fall off during the soaking phase, save them for the end and gently place them back on the bottle and the residual glue should allow them to stick right back on.
Step 8: Light those DIY, made with T.L.C., Milliaire bottle candles and enjoy! Heck, have a glass of wine or two, you’ll feel accomplished!
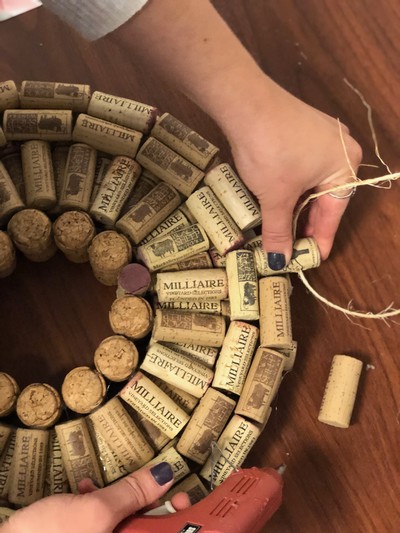
DIY Cork Wreaths
Christmas time is here, and the big day is right around the corner. Before it ends, however, we had one last craft that we needed to get out of our system: a cork wreath! Easy to make and even easier to accumulate corks for, this DIY friendly craft is something you can make alone or with friends while sipping on a glass of wine. Follow our step by step guide to learn how we created our very own Milliaire Winery & Black Sheep Vintners Cork Wreath.
Step 1: Cut out a piece of cardboard to the size you desire.
Step 2: Grab that hot glue gun, lay out your corks and get to gluing. Don’t forget to plan out the width between each cork and map out a rough estimation of the design before gluing- it will help the rest of the process.
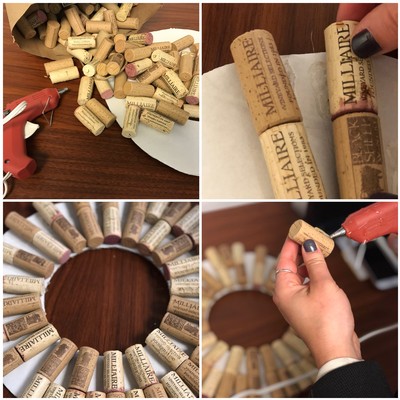
Step 3: After finishing one row of corks going one way, finish it off with a layer going the opposite direction. The different layers help to break up the continuity and make for a more intriguing design.
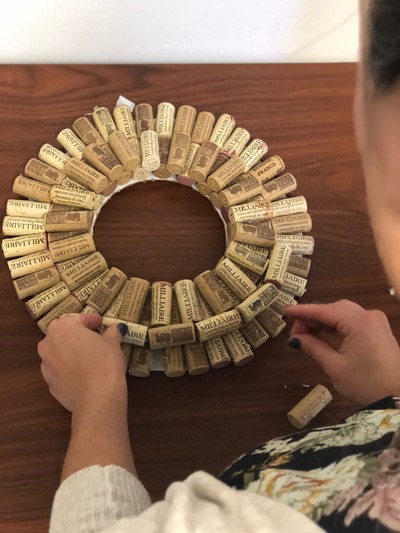
Step 4: We ended up gluing a few corks to the top of the wreath where wanted to hang it. We drilled out a hole in the middle of one of them and fed a string through it. We also added champagne corks to the middle of the wreath for added pizzazz.
Step 5: Let glue dry, add a bow over an area you might not be too fond of if you’re a perfectionist and remember: art is forgiveness!
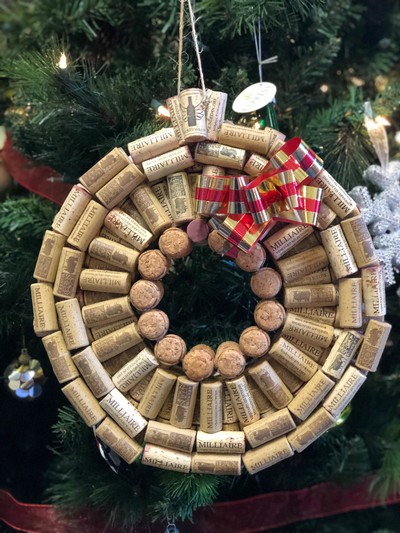
Voila! You have a custom made cork wreath!
Recent Posts
-
March 29, 2018
-
February 1, 2018
-
December 21, 2017
-
December 6, 2017(2 Comments)
-
November 13, 2017(1 Comment)
-
November 7, 2017(1 Comment)